
Automate your Functions (Time-based Automation)
This tutorial shows you how to use Chainlink Automation to automate your Chainlink Functions. Automation is essential when you want to trigger the same function regularly, such as fetching weather data daily or fetching an asset price on every block.
Read the API multiple calls tutorial before you follow the steps in this example. This tutorial uses the same example but with an important difference:
-
You will deploy AutomatedFunctionsConsumerExample.sol instead of the FunctionsConsumerExample contract.
After you deploy and set up your contract, Chainlink Automation triggers your function according to a time schedule.
Prerequisites
Set up your environment
You must provide the private key from a testnet wallet to run the examples in this documentation. Install a Web3 wallet, configure Node.js, clone the smartcontractkit/smart-contract-examples repository, and configure a .env.enc file with the required environment variables.
Install and configure your Web3 wallet for Polygon Mumbai:
-
Install Deno so you can compile and simulate your Functions source code on your local machine.
-
Install the MetaMask wallet or other Ethereum Web3 wallet.
-
Set the network for your wallet to the Polygon Mumbai testnet. If you need to add Mumbai to your wallet, you can find the chain ID and the LINK token contract address on the LINK Token Contracts page.
-
Request testnet MATIC from the Polygon Faucet.
-
Request testnet LINK from faucets.chain.link/mumbai.
Install the required frameworks and dependencies:
-
Install the latest release of Node.js 20. Optionally, you can use the nvm package to switch between Node.js versions with
nvm use 20.Note: To ensure you are running the correct version in a terminal, type
node -v.node -v$ node -v v20.9.0 -
In a terminal, clone the smart-contract examples repository and change directories. This example repository imports the Chainlink Functions Toolkit NPM package. You can import this package to your own projects to enable them to work with Chainlink Functions.
git clone https://github.com/smartcontractkit/smart-contract-examples.git && \ cd ./smart-contract-examples/functions-examples/ -
Run
npm installto install the dependencies.npm install -
For higher security, the examples repository encrypts your environment variables at rest.
-
Set an encryption password for your environment variables.
npx env-enc set-pw -
Run
npx env-enc setto configure a.env.encfile with the basic variables that you need to send your requests to the Polygon Mumbai network.-
POLYGON_MUMBAI_RPC_URL: Set a URL for the Polygon Mumbai testnet. You can sign up for a personal endpoint from Alchemy, Infura, or another node provider service. -
PRIVATE_KEY: Find the private key for your testnet wallet. If you use MetaMask, follow the instructions to Export a Private Key. Note: Your private key is needed to sign any transactions you make such as making requests.
npx env-enc set -
-
Configure your on-chain resources
After you configure your local environment, configure some on-chain resources to process your requests, receive the responses, and pay for the work done by the DON.
Deploy a Functions consumer contract on Polygon Mumbai
-
Compile the contract.
-
Open MetaMask and select the Polygon Mumbai network.
-
In Remix under the Deploy & Run Transactions tab, select Injected Provider - MetaMask in the Environment list. Remix will use the MetaMask wallet to communicate with Polygon Mumbai.
-
Under the Deploy section, fill in the router address for your specific blockchain. You can find both of these addresses on the Supported Networks page. For Polygon Mumbai, the router address is
0x6E2dc0F9DB014aE19888F539E59285D2Ea04244C. -
Click the Deploy button to deploy the contract. MetaMask prompts you to confirm the transaction. Check the transaction details to make sure you are deploying the contract to Polygon Mumbai.
-
After you confirm the transaction, the contract address appears in the Deployed Contracts list. Copy the contract address.
Create a subscription
Follow the Managing Functions Subscriptions guide to accept the Chainlink Functions Terms of Service (ToS), create a subscription, fund it, then add your consumer contract address to it.
You can find the Chainlink Functions Subscription Manager at functions.chain.link.
Tutorial
This tutorial is configured to get the median BTC/USD price from multiple data sources according to a time schedule. For a detailed explanation of the code example, read the Examine the code section.
You can locate the scripts used in this tutorial in the examples/10-automate-functions directory.
-
Make sure to understand the API multiple calls guide.
-
Make sure your subscription has enough LINK to pay for your requests. Also, you must maintain a minimum balance to upload encrypted secrets to the DON (Read the minimum balance for uploading encrypted secrets section to learn more). You can check your subscription details (including the balance in LINK) in the Chainlink Functions Subscription Manager. If your subscription runs out of LINK, follow the Fund a Subscription guide. This guide recommends maintaining at least 2 LINK within your subscription.
-
Get a free API key from CoinMarketCap and note your API key.
-
Run
npx env-enc setto add an encryptedCOINMARKETCAP_API_KEYto your.env.encfile.npx env-enc set
Deploy an Automated Functions Consumer contract
-
Deploy a Functions consumer contract on Polygon Mumbai:
- Open the AutomatedFunctionsConsumerExample.sol in Remix.
- Compile the contract.
- Open MetaMask and select the Polygon Mumbai network.
- In Remix under the Deploy & Run Transactions tab, select Injected Provider - MetaMask in the Environment list. Remix will use the MetaMask wallet to communicate with Polygon Mumbai.
- Under the Deploy section, fill in the router address for your specific blockchain. You can find both of these addresses on the Supported Networks page. For Polygon Mumbai, the router address is
0x6E2dc0F9DB014aE19888F539E59285D2Ea04244C. - Click the Deploy button to deploy the contract. MetaMask prompts you to confirm the transaction. Check the transaction details to make sure you are deploying the contract to Polygon Mumbai.
- After you confirm the transaction, the contract address appears in the Deployed Contracts list. Copy your contract address.
-
Create a Chainlink Functions subscription and add your contract as an approved consumer contract. Note: If you followed the previous tutorials, then you can reuse your existing subscription.
Configure Chainlink Automation
The consumer contract that you deployed is designed to be used with a time-based automation. Follow the instructions in the Automation Job Scheduler guide to register your deployed contract using the Chainlink Automation App. Use the following upkeep settings:
- Trigger: Time-based
- Target contract address: The address of the Chainlink Functions consumer contract that you deployed
- ABI: copy/paste the abi from automatedFunctions.json
- Target function: sendRequestCBOR
- Time interval: Every 15 minutes
- Gas limit:
1000000 - Starting balance (LINK):
1
You can leave the other settings at their default values for the example in this tutorial. Note: After creation, check your upkeep details and note the address of the upkeep contract. The upkeep contract is responsible for calling your Functions consumer contract at regular times intervals.
Configure your Automation Consumer contract
Two important steps are done here:
-
Configure your contract so only the upkeep contract can call the
sendRequestCBORfunction. This security measure is important to prevent anyone from calling several timessendRequestCBORand draining your Functions subscription balance. Follow these steps:- On RemixIDE, under the Deploy & Transactions tab, locate your deployed Functions consumer contract.
- Open the list of functions.
- Fill in the
setAutomationCronContractfunction with the upkeep contract address you copied from the previous step. - Click on transact. A Metamask popup appears and asks you to confirm the transaction.
- Confirm the transaction and wait for it to be confirmed.
-
Configure the request details by calling the
updateRequestfunction. This step stores the encoded request (source code, reference to encrypted secrets if any, arguments), gas limit, subscription ID, and job ID in the contract storage (see Examine the code). To do so, follow these steps:- On a terminal, go to the Functions tutorials directory.
- Open updateRequest.js and replace the consumer contract address and the subscription ID with your own values:
const consumerAddress = "0x5abE77Ba2aE8918bfD96e2e382d5f213f10D39fA" // REPLACE this with your Functions consumer address const subscriptionId = 3 // REPLACE this with your subscription ID-
Run the updateRequest.js script.
node examples/10-automate-functions/updateRequest.jsExample:
$ node examples/10-automate-functions/updateRequest.js
secp256k1 unavailable, reverting to browser version
Start simulation...
Performing simulation with the following versions:
deno 1.36.3 (release, aarch64-apple-darwin)
v8 11.6.189.12
typescript 5.1.6


Simulation result {
  capturedTerminalOutput: 'Median Bitcoin price: 25702.07\n',
  responseBytesHexstring: '0x00000000000000000000000000000000000000000000000000000000002737df'
}
✅ Decoded response to uint256:  2570207n

Make request...
Upload encrypted secret to gateways https://01.functions-gateway.testnet.chain.link/user. StorageSlotId 0. Expiration in minutes: 150

✅ Secrets uploaded properly to gateways https://01.functions-gateway.testnet.chain.link/user! Gateways response:  { version: 1693925775, success: true }

✅ Automated Functions request settings updated! Transaction hash 0x6017e4b36f80c7d06e0f0f1dd48239e688419a8141b90ad944bff89232fa8e14 - Check the explorer https://mumbai.polygonscan.com/tx/0x6017e4b36f80c7d06e0f0f1dd48239e688419a8141b90ad944bff89232fa8e14
The output of the example gives you the following information:
- Your request is first run on a sandbox environment to ensure it is correctly configured.
- The encrypted secrets were uploaded to the secrets endpoint
https://01.functions-gateway.testnet.chain.link/user. - The Functions consumer contract's request details are updated.
At this stage, your Functions consumer contract is configured to get the median Bitcoin price every 15 minutes.
Check Result
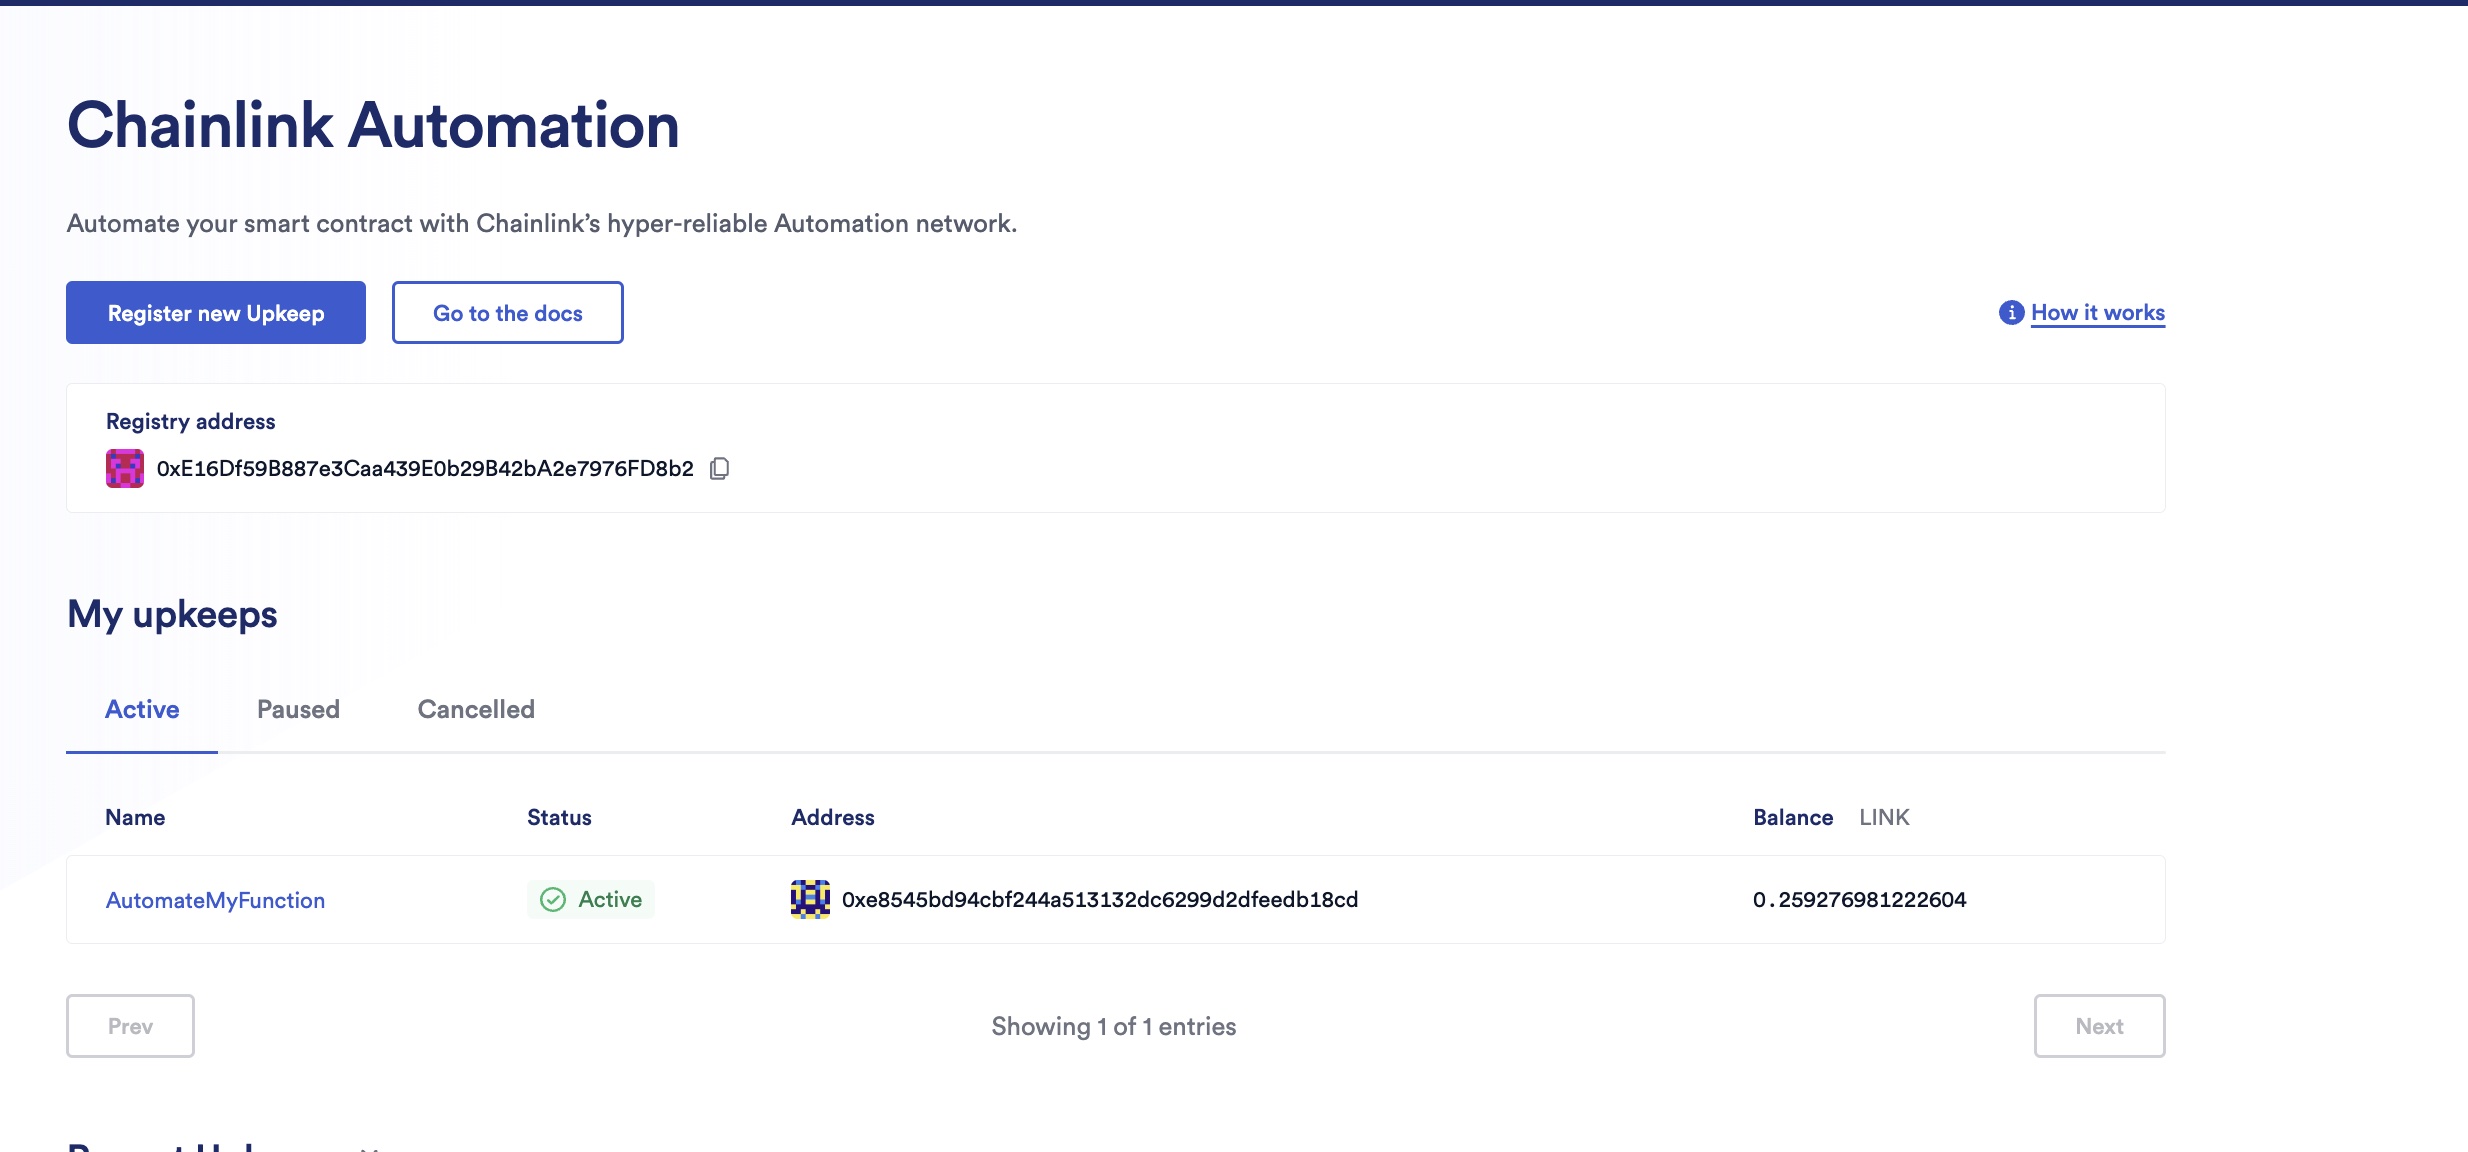
Go to the Chainlink Automation App and connect to Polygon Mumbai. Your upkeep will be listed under My upkeeps:
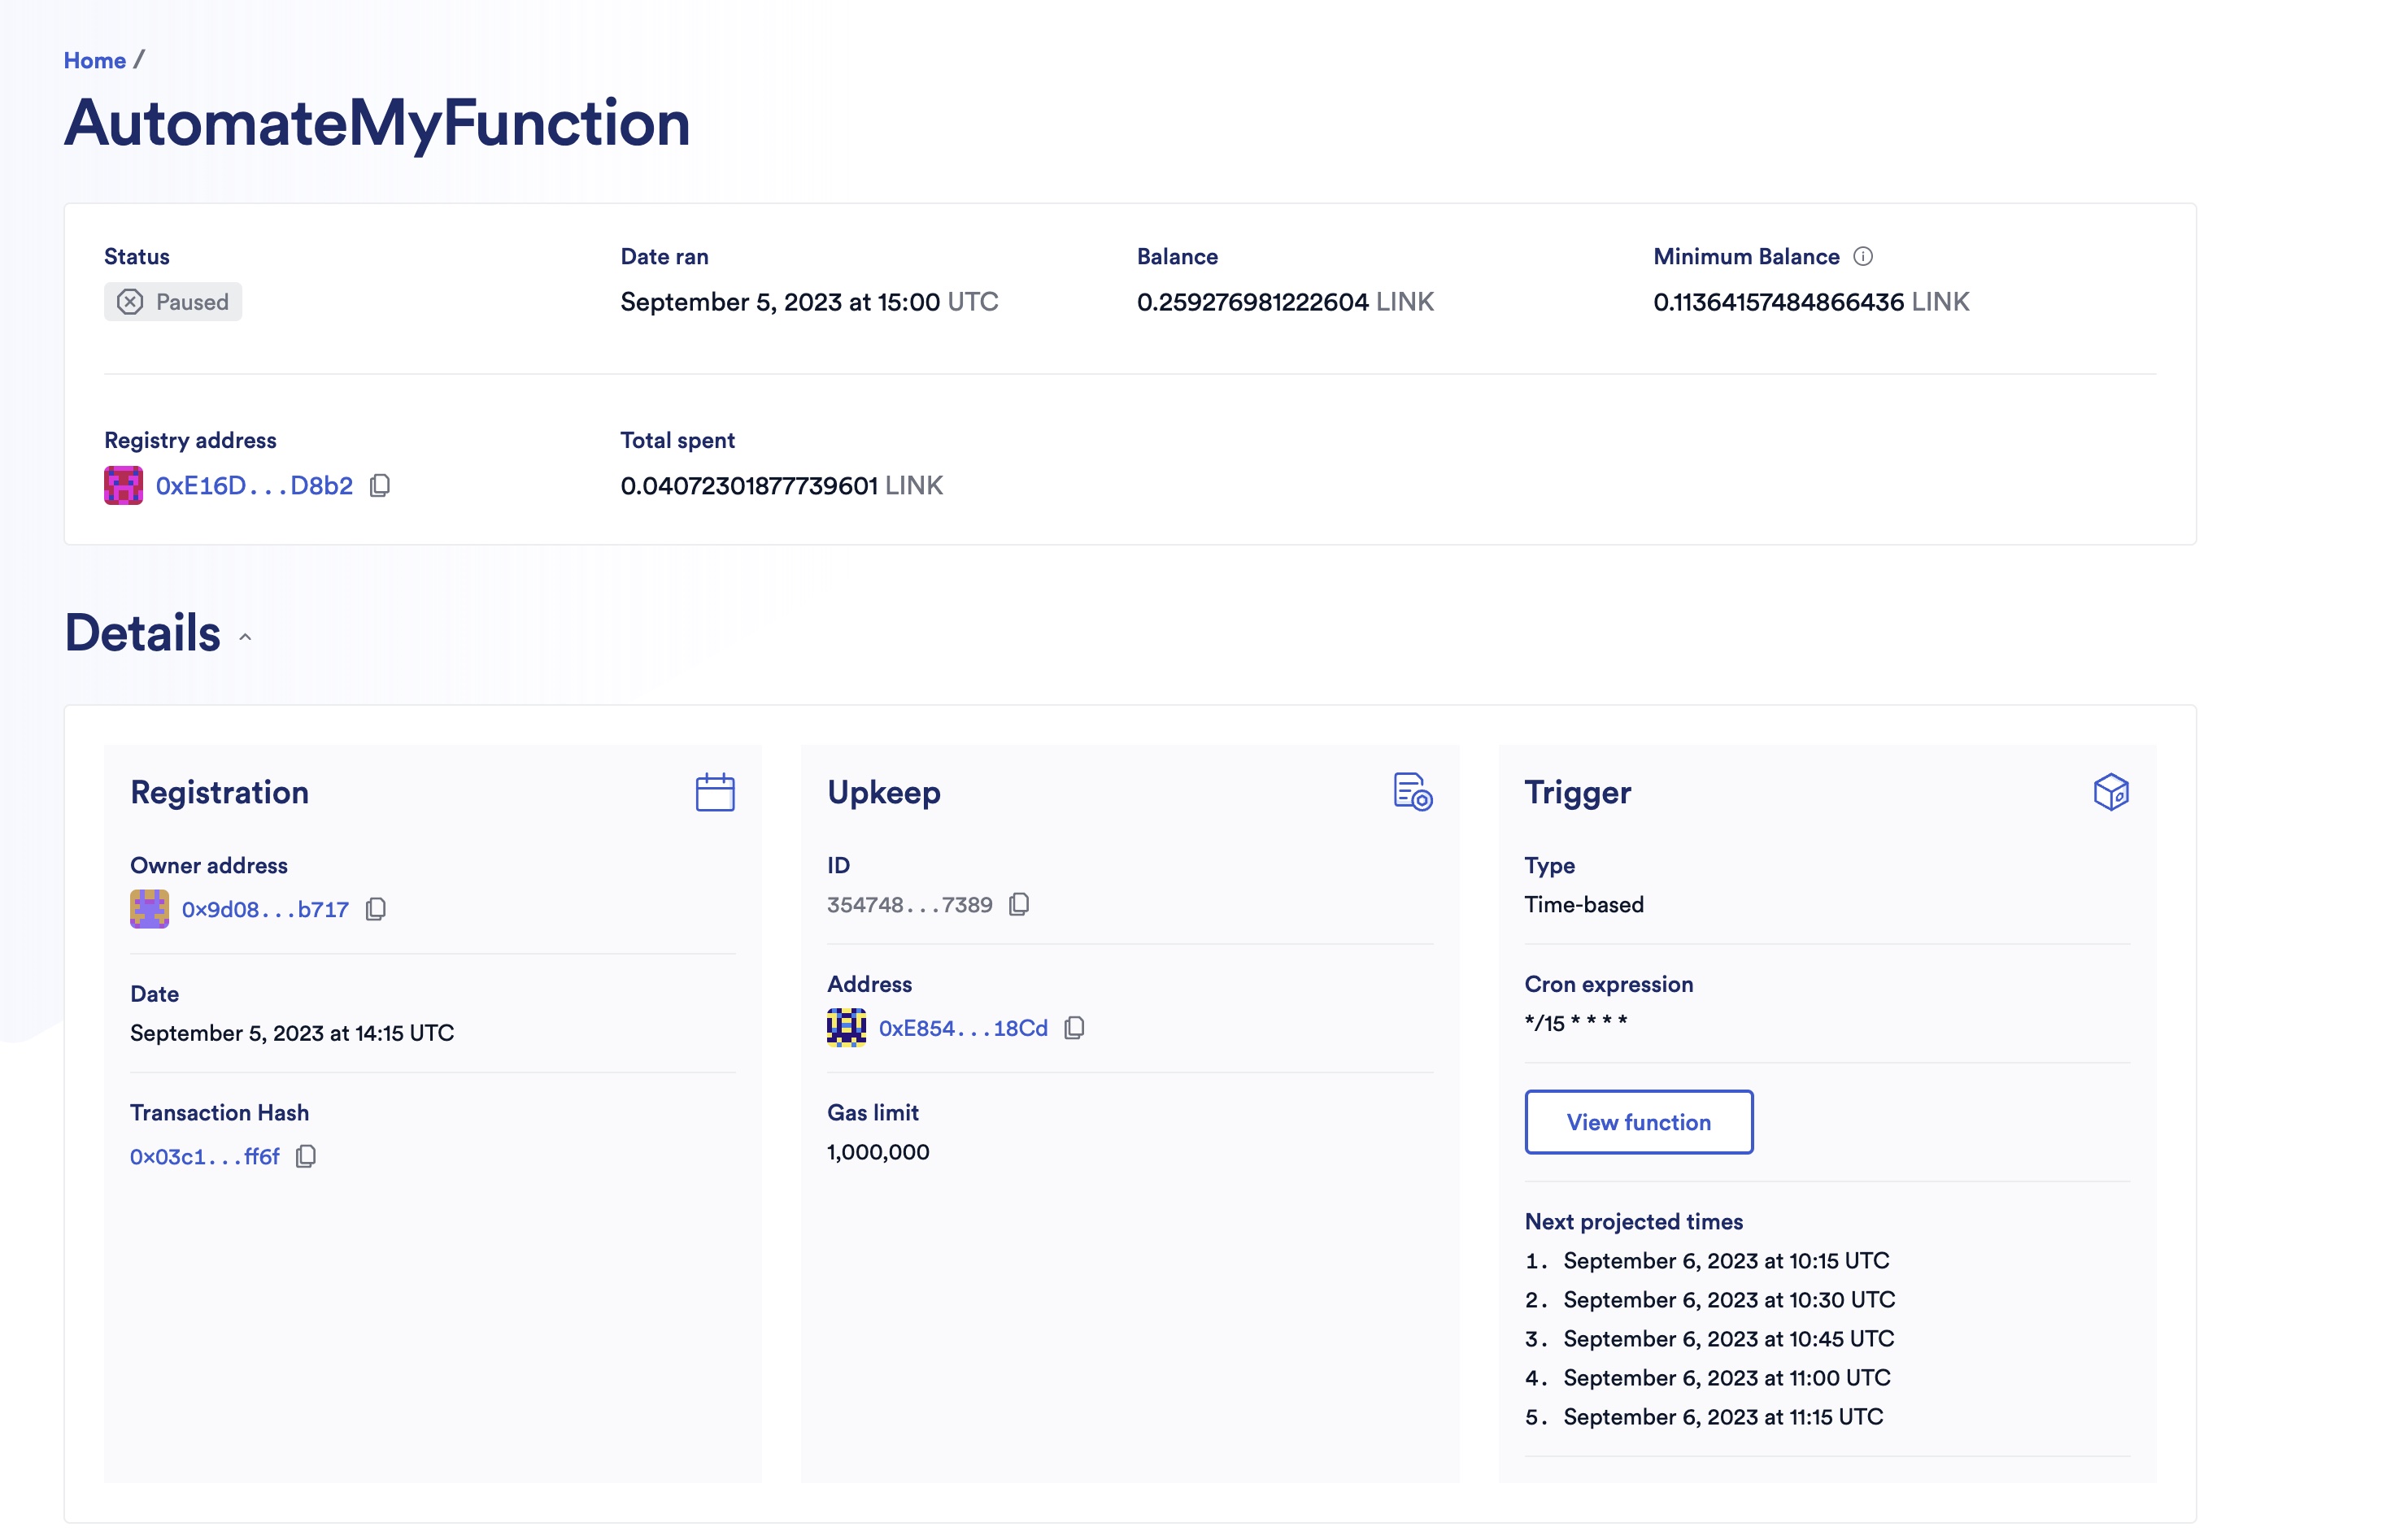
Click on your upkeep to fetch de details:
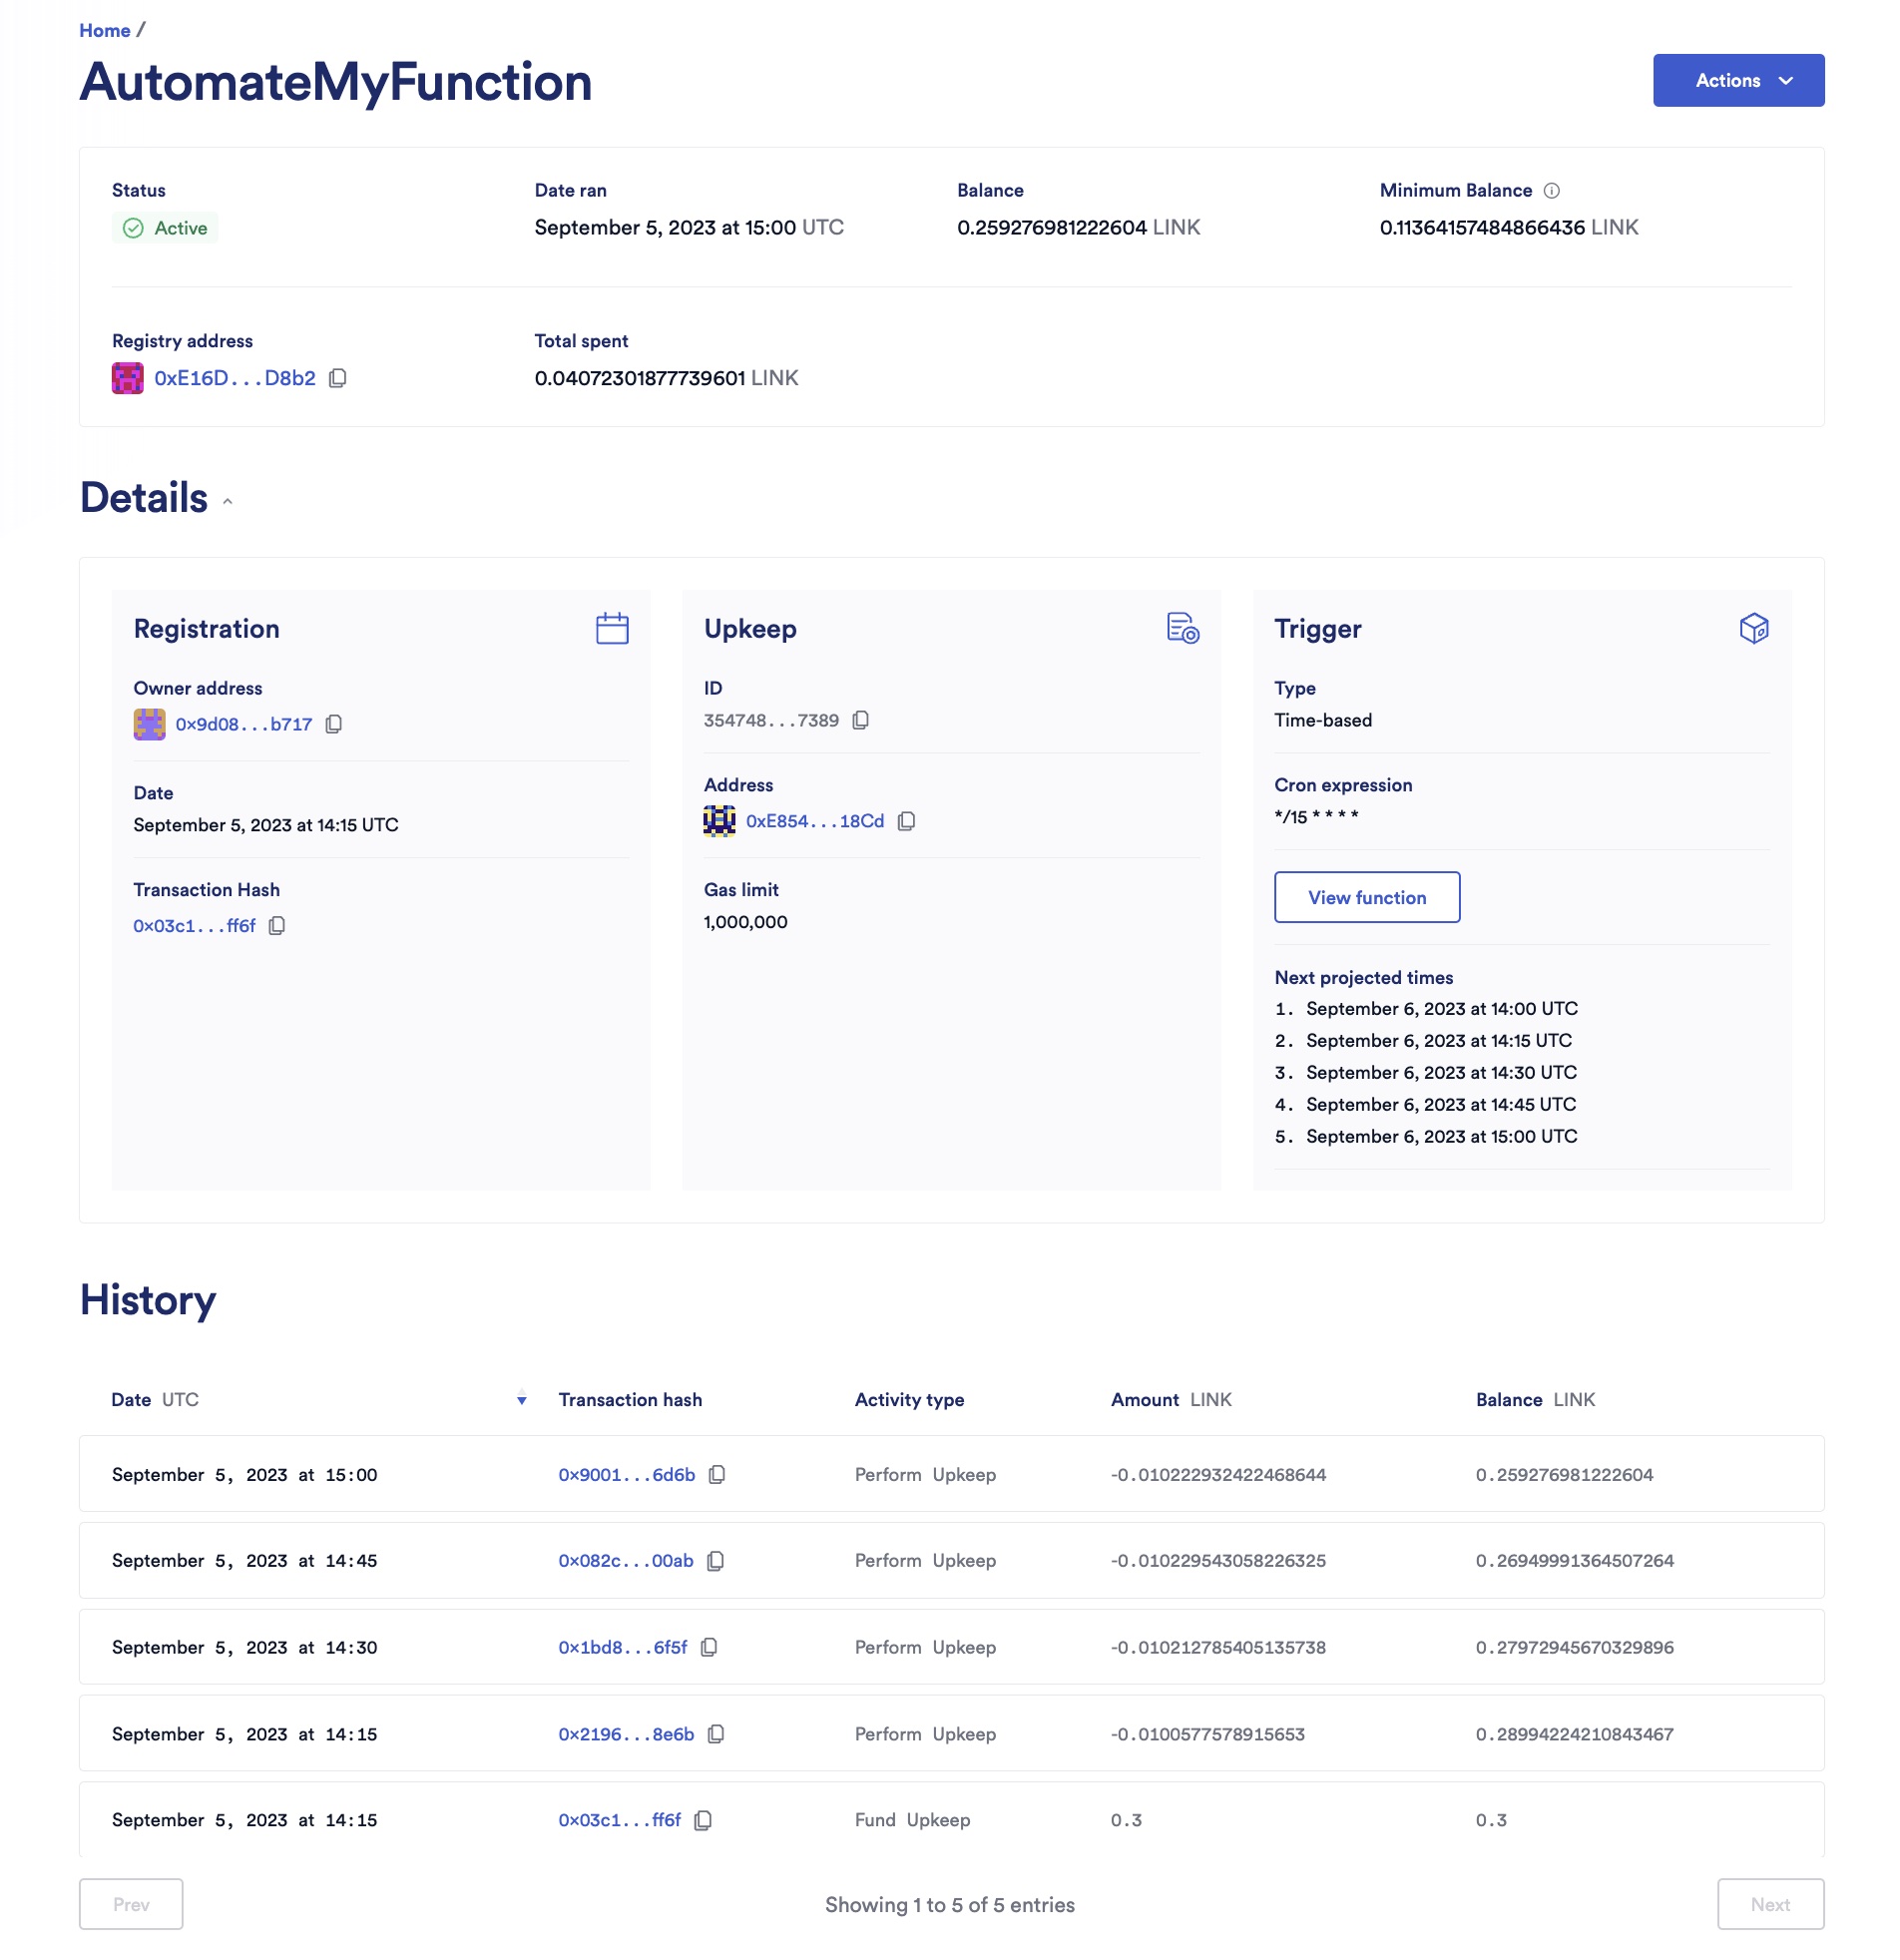
As you can see in the History table, the upkeep is running every 15 minutes. On your terminal, run the readLatest to read the latest received response:
- Open
readLatest.jsand replace the consumer contract address with your own values:
const consumerAddress = "0x5abE77Ba2aE8918bfD96e2e382d5f213f10D39fA" // REPLACE this with your Functions consumer address- Run the readLatest script.
node examples/10-automate-functions/readLatest.jsExample:
$ node examples/10-automate-functions/readLatest.js
secp256k1 unavailable, reverting to browser version
Last request ID is 0x38687b48c9d8dfc7115d516840d45089a5409557765f031c14b332913e92ee7e
✅ Decoded response to uint256:  2570207n
Clean up
After you finish the guide:
- Cancel your upkeep from the Chainlink Automation App. Note: Remember to withdraw funds after you cancel the upkeep. There is a 50-block delay once upkeep between the moment you cancel your upkeep and the moment you can withdraw funds.
Examine the code
AutomatedFunctionsConsumer.sol
// SPDX-License-Identifier: MIT
pragma solidity 0.8.19;

import {FunctionsClient} from "@chainlink/contracts/src/v0.8/functions/dev/v1_0_0/FunctionsClient.sol";
import {ConfirmedOwner} from "@chainlink/contracts/src/v0.8/shared/access/ConfirmedOwner.sol";

/**
 * @title Functions contract used for Automation.
 * @notice This contract is a demonstration of using Functions and Automation.
 * @notice You may need to add a Forwarder for additional security.
 * @notice NOT FOR PRODUCTION USE
 */
contract AutomatedFunctionsConsumerExample is FunctionsClient, ConfirmedOwner {
    address public upkeepContract;
    bytes public request;
    uint64 public subscriptionId;
    uint32 public gasLimit;
    bytes32 public donID;
    bytes32 public s_lastRequestId;
    bytes public s_lastResponse;
    bytes public s_lastError;

    error NotAllowedCaller(
        address caller,
        address owner,
        address automationRegistry
    );
    error UnexpectedRequestID(bytes32 requestId);

    event Response(bytes32 indexed requestId, bytes response, bytes err);

    constructor(
        address router
    ) FunctionsClient(router) ConfirmedOwner(msg.sender) {}

    /**
     * @notice Reverts if called by anyone other than the contract owner or automation registry.
     */
    modifier onlyAllowed() {
        if (msg.sender != owner() && msg.sender != upkeepContract)
            revert NotAllowedCaller(msg.sender, owner(), upkeepContract);
        _;
    }

    function setAutomationCronContract(
        address _upkeepContract
    ) external onlyOwner {
        upkeepContract = _upkeepContract;
    }

    /// @notice Update the request settings
    /// @dev Only callable by the owner of the contract
    /// @param _request The new encoded CBOR request to be set. The request is encoded off-chain
    /// @param _subscriptionId The new subscription ID to be set
    /// @param _gasLimit The new gas limit to be set
    /// @param _donID The new job ID to be set
    function updateRequest(
        bytes memory _request,
        uint64 _subscriptionId,
        uint32 _gasLimit,
        bytes32 _donID
    ) external onlyOwner {
        request = _request;
        subscriptionId = _subscriptionId;
        gasLimit = _gasLimit;
        donID = _donID;
    }

    /**
     * @notice Send a pre-encoded CBOR request
     * @return requestId The ID of the sent request
     */
    function sendRequestCBOR()
        external
        onlyAllowed
        returns (bytes32 requestId)
    {
        s_lastRequestId = _sendRequest(
            request,
            subscriptionId,
            gasLimit,
            donID
        );
        return s_lastRequestId;
    }

    /**
     * @notice Store latest result/error
     * @param requestId The request ID, returned by sendRequest()
     * @param response Aggregated response from the user code
     * @param err Aggregated error from the user code or from the execution pipeline
     * Either response or error parameter will be set, but never both
     */
    function fulfillRequest(
        bytes32 requestId,
        bytes memory response,
        bytes memory err
    ) internal override {
        if (s_lastRequestId != requestId) {
            revert UnexpectedRequestID(requestId);
        }
        s_lastResponse = response;
        s_lastError = err;
        emit Response(requestId, s_lastResponse, s_lastError);
    }
}
-
To write an automated Chainlink Functions consumer contract, your contract must import FunctionsClient.sol. You can read the API reference of FunctionsClient.
The contract is available in an NPM package, so you can import it from within your project.
import {FunctionsClient} from "@chainlink/contracts/src/v0.8/functions/dev/v1_0_0/FunctionsClient.sol"; -
The
upkeepContractaddress is stored in the contract storage. The contract owner sets this variable by calling thesetAutomationCronContractfunction. Note: This variable is used by theonlyAllowedto ensure only the upkeep contract can call thesendRequestCBORfunction.address public upkeepContract -
The encoded
request,subscriptionId,gasLimit, andjobIdare stored in the contract storage. The contract owner sets these variables by calling theupdateRequestfunction. Note: The request (source code, secrets, if any, and arguments) is encoded off-chain. -
The latest request id, latest received response, and latest received error (if any) are defined as state variables:
bytes32 public s_lastRequestId; bytes public s_lastResponse; bytes public s_lastError; -
We define the
Responseevent that your smart contract will emit during the callbackevent Response(bytes32 indexed requestId, bytes response, bytes err); -
Pass the router address for your network when you deploy the contract:
constructor(address router) FunctionsClient(router) -
The two remaining functions are:
-
sendRequestCBORfor sending a request already encoded inbytes. It sends the request to the router by calling theFunctionsClientsendRequestfunction. -
fulfillRequestto be invoked during the callback. This function is defined inFunctionsClientasvirtual(readfulfillRequestAPI reference). So, your smart contract must override the function to implement the callback. The implementation of the callback is straightforward: the contract stores the latest response and error ins_lastResponseands_lastErrorbefore emitting theResponseevent.s_lastResponse = response; s_lastError = err; emit Response(requestId, s_lastResponse, s_lastError);
-
source.js
The JavaScript code is similar to the Call Multiple Data Sources tutorial.
updateRequest.js
This explanation focuses on the update.js script and shows how to use the Chainlink Functions NPM package in your own JavaScript/TypeScript project to encode a request off-chain then store in your contract. The code is self-explanatory and has comments to help you understand all the steps.
The script imports:
- path and fs : Used to read the source file.
- ethers: Ethers.js library, enables the script to interact with the blockchain.
@chainlink/functions-toolkit: Chainlink Functions NPM package. All its utilities are documented in the NPM README.@chainlink/env-enc: A tool for loading and storing encrypted environment variables. Read the official documentation to learn more.../abi/automatedFunctions.json: The abi of the contract your script will interact with. Note: The script was tested with this AutomatedFunctionsConsumer contract.
The script has two hardcoded values that you have to change using your own Functions consumer contract and subscription ID:
const consumerAddress = "0x5abE77Ba2aE8918bfD96e2e382d5f213f10D39fA" // REPLACE this with your Functions consumer address
const subscriptionId = 3 // REPLACE this with your subscription ID
The primary function that the script executes is updateRequestMumbai. This function can be broken into five main parts:
-
Definition of necessary identifiers:
routerAddress: Chainlink Functions router address on Polygon Mumbai.donId: Identifier of the DON that will fulfill your requests on Polygon Mumbai.gatewayUrls: The secrets endpoint URL to which you will upload the encrypted secrets.explorerUrl: Block explorer url of Polygon Mumbai.source: The source code must be a string object. That's why we usefs.readFileSyncto readsource.jsand then calltoString()to get the content as astringobject.args: During the execution of your function, These arguments are passed to the source code. Theargsvalue is["1", "bitcoin", "btc-bitcoin"]. These arguments are BTC IDs at CoinMarketCap, CoinGecko, and Coinpaprika. You can adapt args to fetch other asset prices.secrets: The secrets object that will be encrypted.slotIdNumber: Slot ID at the DON where to upload the encrypted secrets.expirationTimeMinutes: Expiration time in minutes of the encrypted secrets.gasLimit: Maximum gas that Chainlink Functions can use when transmitting the response to your contract.- Initialization of ethers
signerandproviderobjects. The signer is used to make transactions on the blockchain, and the provider reads data from the blockchain.
-
Simulating your request in a local sandbox environment:
- Use
simulateScriptfrom the Chainlink Functions NPM package. - Read the
responseof the simulation. If successful, use the Functions NPM packagedecodeResultfunction andReturnTypeenum to decode the response to the expected returned type (ReturnType.uint256in this example).
- Use
-
Encrypt the secrets, upload the encrypted secrets to the DON, and then encode the reference to the DON-hosted encrypted secrets. This is done in three steps:
- Initialize a
SecretsManagerinstance from the Functions NPM package, then call theencryptSecretsfunction. - Call the
uploadEncryptedSecretsToDONfunction of theSecretsManagerinstance. This function returns an object containing asuccessboolean as long asversion, the secret version on the DON storage. - Call the
buildDONHostedEncryptedSecretsReferencefunction of theSecretsManagerinstance and use the slot ID and version to encode the DON-hosted encrypted secrets reference.
- Initialize a
-
Encode the request data off-chain using the
buildRequestCBORfunction from the Functions NPM package. -
Update the Functions consumer contract:
- Initialize your functions consumer contract using the contract address, abi, and ethers signer.
- Call the
updateRequestfunction of your consumer contract.
readLatest.js
This explanation focuses on the readLatest script and that reads the latest receive response of your consumer contract then decode it off-chain using the Chainlink Function NPM package.
The script has one hardcoded values that you have to change using your own Functions consumer contract address:
const consumerAddress = "0x5abE77Ba2aE8918bfD96e2e382d5f213f10D39fA" // REPLACE this with your Functions consumer addressThe primary function that the script executes is readLatest. This function can be broken into two main parts:
-
Read the latest response:
- Initialize your functions consumer contract using the contract address, abi, and ethers provider.
- Call the
s_lastRequestId,s_lastResponse, ands_lastErrorfunctions of your consumer contract.
-
Decode the latest response:
- If there was an error, read the latest error and parse it to
string. - If there was no error, use the Functions NPM package
decodeResultfunction andReturnTypeenum to decode the response to the expected returned type (ReturnType.uint256in this example).
- If there was an error, read the latest error and parse it to